Saving Bitmap Camera Images to the SD Card
This tutorial shows you how to capture a frame from the Portenta Vision Shield Camera module and save the output as a bitmap image.
Overview
This tutorial shows you how to capture a frame from the Portenta Vision Shield Camera module and save the output as a bitmap image. It will allow you to see the output directly on your computer without using any third party tool.
Goals
- Capturing a frame from the camera.
- Make the bitmap binary file with the correct settings.
- Save the bitmap on an SD Card.
- Visualize the captured image on your computer.
Required Hardware and Software
- Portenta H7
- Portenta Vision Shield (LoRa or Ethernet)
- 1x USB-C® cable (either USB-A to USB-C® or USB-C® to USB-C®)
- Micro SD card
- Arduino IDE or Arduino-cli
Instructions
1. The Setup
Connect the Portenta Vision Shield to your Portenta H7 as shown in the figure. The top and bottom high density connectors are connected to the corresponding ones on the underside of the H7 board. Plug in the H7 to your computer using the USB-C® cable.

The Camera
You will be using the Himax HM-01B0 camera module which has a resolution of 320 by 240 and the output data its in grayscale with 8 bits per pixel (bpp). It is important to have this in mind as the
.bmpInside the sketch, you can use these libraries to access the camera APIs, also compatible with the Arduino Nicla Vision
1#include "camera.h" // Multi Media Card APIs2#include "himax.h" // API to read from the Himax camera found on the Portenta Vision ShieldBitmap File Format
The bitmap binary file needs to contain some information in order to tell the computer for example the resolution of the picture and the bit-depth (bpp). Bit depth refers to the color information stored in the image. The higher the bit depth of an image, the more colors it can store. As the bit depth increases, the file size of the image also increases, because more color information has to be stored for each pixel in the image.
The following table shows all the headers, the size of its buffer, offsets, the settings that are being used with their details:
| Name | Size | Details |
|---|---|---|
| DIB | 14 Bytes | Bitmap information, setting the size of the file. |
| File Header | 40 Bytes | This header requires the resolution and the bpp |
| Palette (Color Map) | 1025 Bytes | This header is mandatory on bitmaps with a bpp ≤ 8, setting the grayscale |
| Image data | 76800 Bytes | The raw image data, in this case each pixel has 8 bits (1 Byte) and the resolution is 320 x 240, with no compression |
The final size of the file is 77.879 KB.
2. The Sketch
You can find the sketch on the latest version of the Arduino_Pro_Tutorials at
examples > Vision Shield to SD Card bmp > visionShieldBitmap.inoYou can see the full sketch in the Full sketch section
First you need to include the needed libraries
1#include "SDMMCBlockDevice.h" // Multi Media Card APIs2#include "FATFileSystem.h" // Mbed API for portable and embedded systems3
4#include "camera.h" // Arduino Mbed Core Camera APIs5#include "himax.h" // API to read from the Himax camera found on the Portenta Vision ShieldThen define the following objects with their respective constructor (
blockDevicefileSystem1#include "SDMMCBlockDevice.h" // Multi Media Card APIs2#include "FATFileSystem.h" // API to run operations on a FAT file system3SDMMCBlockDevice blockDevice;4mbed::FATFileSystem fileSystem("fs");5
6#include "camera.h" // Arduino Mbed Core Camera APIs7#include "himax.h" // API to read from the Himax camera found on the Portenta Vision Shield8HM01B0 himax;9Camera cam(himax);10
11FrameBuffer frameBuffer; // Buffer to save the camera streamFor the bitmap headers binary file you will need some information like the resolution of the image, the bits per pixel and more; so you can define your settings as shown:
1// Settings for our setup2#define IMAGE_HEIGHT (unsigned int)2403#define IMAGE_WIDTH (unsigned int)3204#define IMAGE_MODE CAMERA_GRAYSCALE5#define BITS_PER_PIXEL (unsigned int)86#define PALETTE_COLORS_AMOUNT (unsigned int)(pow(2, BITS_PER_PIXEL))7#define PALETTE_SIZE (unsigned int)(PALETTE_COLORS_AMOUNT * 4) // 4 bytes = 32bit per color (3 bytes RGB and 1 byte 0x00)8#define IMAGE_PATH "/fs/image.bmp"9
10// Headers info11#define BITMAP_FILE_HEADER_SIZE (unsigned int)14 // For storing general information about the bitmap image file12#define DIB_HEADER_SIZE (unsigned int)40 // For storing information about the image and define the pixel format13#define HEADER_SIZE (BITMAP_FILE_HEADER_SIZE + DIB_HEADER_SIZE)The program has the following functions declared:
void mountSDCard()unsigned char * captureImage()void setFileHeaders(bitmapFileHeaders, bitmapDIBHeader, fileSize)void setColorMap(colorMap)saveImage(imageData, imagePath)
To mount the SD Card you will use the following function in the sketch:
1// Mount File system block2void mountSDCard(){3 int error = fileSystem.mount(&blockDevice);4 if (error){5 Serial.println("Trying to reformat...");6 int formattingError = fileSystem.reformat(&blockDevice);7 if (formattingError) { 8 Serial.println("No SD Card found");9 while (1);10 }11 }12}The function to capture the frame from the camera:
1// Get the raw image data (8bpp grayscale)2unsigned char * captureImage(){3 if (cam.grabFrame(frameBuffer, 3000) == 0){4 return frameBuffer.getBuffer();5 } else {6 Serial.println("could not grab the frame");7 while (1);8 }9}To manipulate the file you will need to set the headers on the binary information as follows:
1// Set the headers data2void setFileHeaders(unsigned char *bitmapFileHeader, unsigned char *bitmapDIBHeader, int fileSize){3 // Set the headers to 04 memset(bitmapFileHeader, (unsigned char)(0), BITMAP_FILE_HEADER_SIZE);5 memset(bitmapDIBHeader, (unsigned char)(0), DIB_HEADER_SIZE);6
7 // File header8 bitmapFileHeader[0] = 'B';9 bitmapFileHeader[1] = 'M';10 bitmapFileHeader[2] = (unsigned char)(fileSize);11 bitmapFileHeader[3] = (unsigned char)(fileSize >> 8);12 bitmapFileHeader[4] = (unsigned char)(fileSize >> 16);13 bitmapFileHeader[5] = (unsigned char)(fileSize >> 24);14 bitmapFileHeader[10] = (unsigned char)HEADER_SIZE + PALETTE_SIZE;15
16 // Info header17 bitmapDIBHeader[0] = (unsigned char)(DIB_HEADER_SIZE);18 bitmapDIBHeader[4] = (unsigned char)(IMAGE_WIDTH);19 bitmapDIBHeader[5] = (unsigned char)(IMAGE_WIDTH >> 8);20 bitmapDIBHeader[8] = (unsigned char)(IMAGE_HEIGHT);21 bitmapDIBHeader[9] = (unsigned char)(IMAGE_HEIGHT >> 8);22 bitmapDIBHeader[14] = (unsigned char)(BITS_PER_PIXEL);23}Take a look at the section Bitmap File Format to better understand the file headers that are created with this function
In this case that our image (320x240) is 8 bits per pixel and grayscale on the bitmap rules you need to define the color table (color map) to assign an specific RGB color for our 8 bit color. On the following function it sets the color map as a grayscale of RGB colors from [R:0x00 G:0x00 B:0x00] to [R:0xFF G:0xFF B:0xFF]
1void setColorMap(unsigned char *colorMap){2 //Init the palette with zeroes3 memset(colorMap, (unsigned char)(0), PALETTE_SIZE);4 5 // Gray scale color palette, 4 bytes per color (R, G, B, 0x00)6 for (int i = 0; i < PALETTE_COLORS_AMOUNT; i++) {7 colorMap[i * 4] = i;8 colorMap[i * 4 + 1] = i;9 colorMap[i * 4 + 2] = i;10 }11}The function in charge to save the image will use the previous functions to set the headers and write the buffers into the file
image.bmp1// Save the headers and the image data into the .bmp file2void saveImage(unsigned char *imageData, const char* imagePath){3 int fileSize = BITMAP_FILE_HEADER_SIZE + DIB_HEADER_SIZE + IMAGE_WIDTH * IMAGE_HEIGHT;4 FILE *file = fopen(imagePath, "w");5
6 // Bitmap structure (Head + DIB Head + ColorMap + binary image)7 unsigned char bitmapFileHeader[BITMAP_FILE_HEADER_SIZE];8 unsigned char bitmapDIBHeader[DIB_HEADER_SIZE];9 unsigned char colorMap[PALETTE_SIZE]; // Needed for <= 8bpp grayscale bitmaps 10
11 setFileHeaders(bitmapFileHeader, bitmapDIBHeader, fileSize);12 setColorMap(colorMap);13
14 // Write the bitmap file15 fwrite(bitmapFileHeader, 1, BITMAP_FILE_HEADER_SIZE, file);16 fwrite(bitmapDIBHeader, 1, DIB_HEADER_SIZE, file);17 fwrite(colorMap, 1, PALETTE_SIZE, file);18 fwrite(imageData, 1, IMAGE_HEIGHT * IMAGE_WIDTH, file);19
20 // Close the file stream21 fclose(file);22}Then to have visual feedback lets add a blink function to make 3 blinks after the photo is taken, once the blue LED is ON it means the picture was taken.
1void countDownBlink(){2 for (int i = 0; i < 6; i++){3 digitalWrite(LEDG, i % 2);4 delay(500);5 }6 digitalWrite(LEDG, HIGH);7 digitalWrite(LEDB, LOW);8}Now that you have all the functions to be used, inside the
setup()1void setup(){2 Serial.begin(115200);3 while (!Serial && millis() < 5000);4 5 Serial.println("Mounting SD Card...");6 mountSDCard();7 Serial.println("SD Card mounted.");8
9 // Init the cam QVGA, 30FPS, Grayscale10 if (!cam.begin(CAMERA_R320x240, IMAGE_MODE, 30)){11 Serial.println("Unable to find the camera");12 }13
14 countDownBlink();15 Serial.println("Fetching camera image...");16 unsigned char *imageData = captureImage();17 18 Serial.println("Saving image to SD card...");19 saveImage(imageData, IMAGE_PATH);20 21 fileSystem.unmount();22 Serial.println("Done. You can now remove the SD card.");23}The
loop()3. Upload the Sketch
Select the right serial port on your IDE and upload the Arduino sketch to your Portenta H7.
4. Try It Out
Insert a micro SD Card into the Portenta Vision Shield.
Connect the Portenta Vision Shield to the Portenta H7.
Once the sketch is uploaded, open the Serial Monitor or wait 5 seconds: you should see that everything is fine and the capture has been taken.
Once the capture is saved, remove the SD Card and plug it into a computer/phone with an SD Card reader, open the storage unit, look for a bitmap called
image.bmp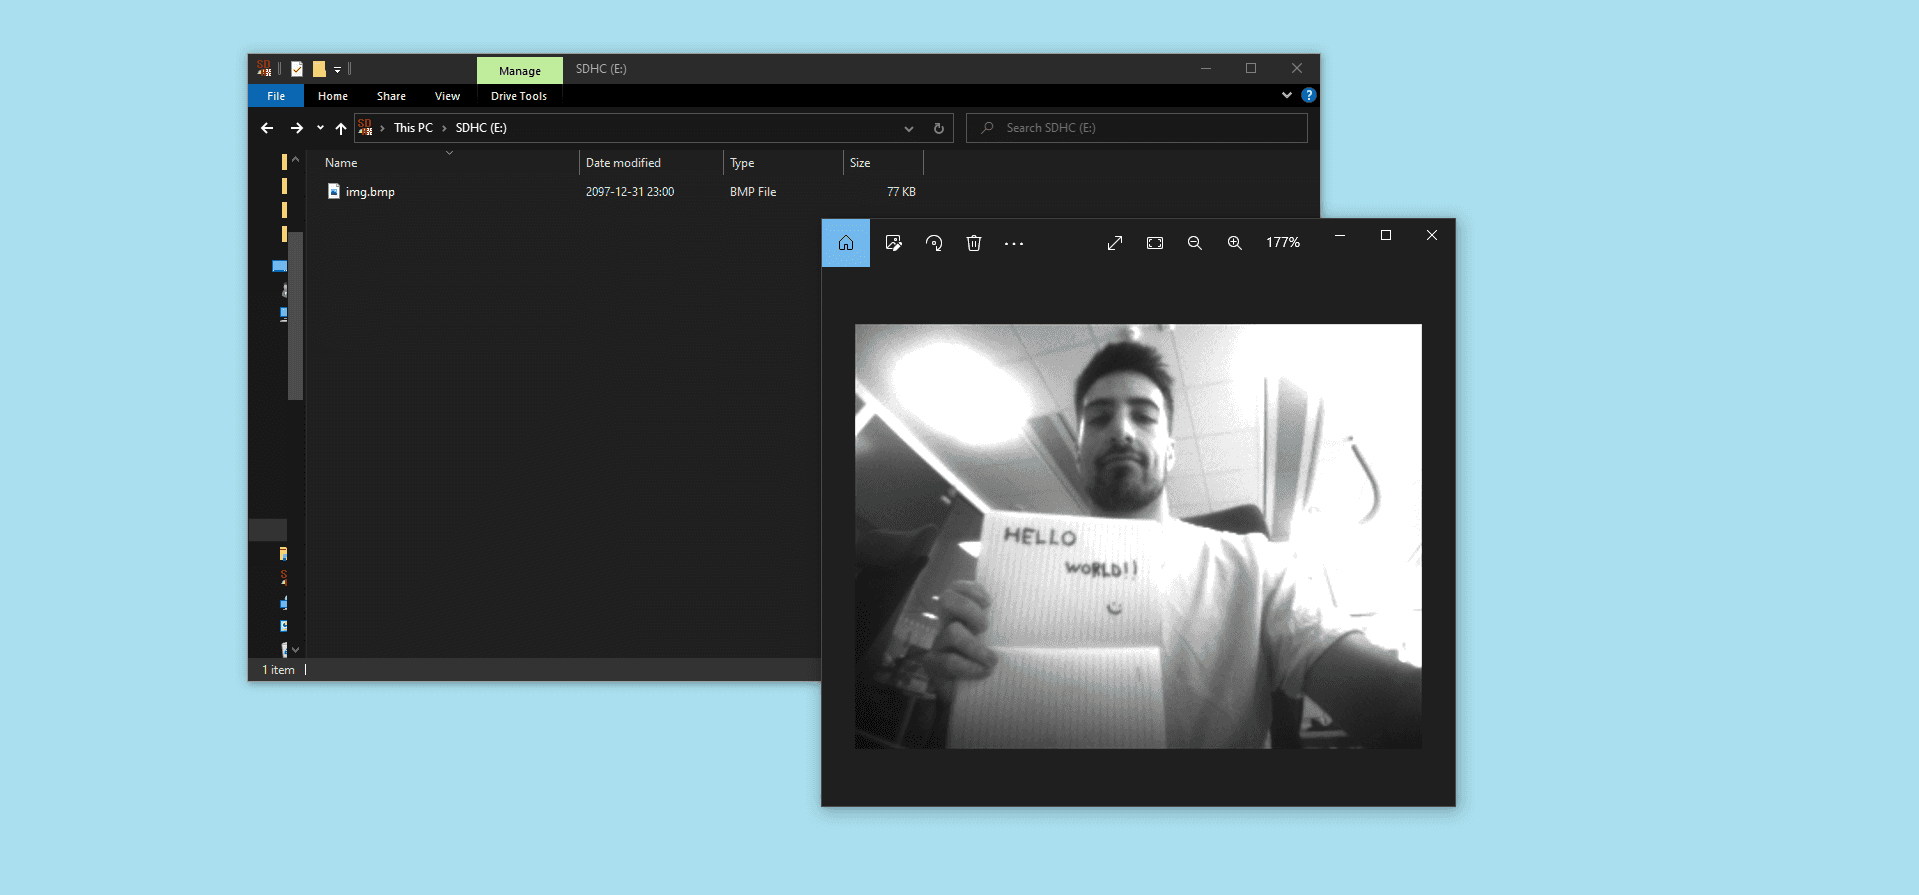
Full Sketch
1#include "SDMMCBlockDevice.h" // Multi Media Card APIs2#include "FATFileSystem.h" // API to run operations on a FAT file system3SDMMCBlockDevice blockDevice;4mbed::FATFileSystem fileSystem("fs");5
6#include "camera.h" // Arduino Mbed Core Camera APIs7#include "himax.h" // API to read from the Himax camera found on the Portenta Vision Shield8HM01B0 himax;9Camera cam(himax);10
11FrameBuffer frameBuffer; // Buffer to save the camera stream12
13// Settings for our setup14#define IMAGE_HEIGHT (unsigned int)24015#define IMAGE_WIDTH (unsigned int)32016#define IMAGE_MODE CAMERA_GRAYSCALE17#define BITS_PER_PIXEL (unsigned int)818#define PALETTE_COLORS_AMOUNT (unsigned int)(pow(2, BITS_PER_PIXEL))19#define PALETTE_SIZE (unsigned int)(PALETTE_COLORS_AMOUNT * 4) // 4 bytes = 32bit per color (3 bytes RGB and 1 byte 0x00)20#define IMAGE_PATH "/fs/image.bmp"21
22// Headers info23#define BITMAP_FILE_HEADER_SIZE (unsigned int)14 // For storing general information about the bitmap image file24#define DIB_HEADER_SIZE (unsigned int)40 // For storing information about the image and define the pixel format25#define HEADER_SIZE (BITMAP_FILE_HEADER_SIZE + DIB_HEADER_SIZE)26
27
28void setup(){29 Serial.begin(115200);30 while (!Serial && millis() < 5000);31 32 Serial.println("Mounting SD Card...");33 mountSDCard();34 Serial.println("SD Card mounted.");35
36 // Init the cam QVGA, 30FPS, Grayscale37 if (!cam.begin(CAMERA_R320x240, IMAGE_MODE, 30)){38 Serial.println("Unable to find the camera");39 }40 countDownBlink();41 Serial.println("Fetching camera image...");42 unsigned char *imageData = captureImage();43 digitalWrite(LEDB, HIGH);44 45 Serial.println("Saving image to SD card...");46 saveImage(imageData, IMAGE_PATH);47 48 fileSystem.unmount();49 Serial.println("Done. You can now remove the SD card.");50}51
52void loop(){53}54
55// Mount File system block56void mountSDCard(){57 int error = fileSystem.mount(&blockDevice);58 if (error){59 Serial.println("Trying to reformat...");60 int formattingError = fileSystem.reformat(&blockDevice);61 if (formattingError) { 62 Serial.println("No SD Card found");63 while (1);64 }65 }66}67
68// Get the raw image data (8bpp grayscale)69unsigned char * captureImage(){70 if (cam.grabFrame(frameBuffer, 3000) == 0){71 return frameBuffer.getBuffer();72 } else {73 Serial.println("could not grab the frame");74 while (1);75 }76}77
78// Set the headers data79void setFileHeaders(unsigned char *bitmapFileHeader, unsigned char *bitmapDIBHeader, int fileSize){80 // Set the headers to 081 memset(bitmapFileHeader, (unsigned char)(0), BITMAP_FILE_HEADER_SIZE);82 memset(bitmapDIBHeader, (unsigned char)(0), DIB_HEADER_SIZE);83
84 // File header85 bitmapFileHeader[0] = 'B';86 bitmapFileHeader[1] = 'M';87 bitmapFileHeader[2] = (unsigned char)(fileSize);88 bitmapFileHeader[3] = (unsigned char)(fileSize >> 8);89 bitmapFileHeader[4] = (unsigned char)(fileSize >> 16);90 bitmapFileHeader[5] = (unsigned char)(fileSize >> 24);91 bitmapFileHeader[10] = (unsigned char)HEADER_SIZE + PALETTE_SIZE;92
93 // Info header94 bitmapDIBHeader[0] = (unsigned char)(DIB_HEADER_SIZE);95 bitmapDIBHeader[4] = (unsigned char)(IMAGE_WIDTH);96 bitmapDIBHeader[5] = (unsigned char)(IMAGE_WIDTH >> 8);97 bitmapDIBHeader[8] = (unsigned char)(IMAGE_HEIGHT);98 bitmapDIBHeader[9] = (unsigned char)(IMAGE_HEIGHT >> 8);99 bitmapDIBHeader[14] = (unsigned char)(BITS_PER_PIXEL);100}101
102void setColorMap(unsigned char *colorMap){103 //Init the palette with zeroes104 memset(colorMap, (unsigned char)(0), PALETTE_SIZE);105 106 // Gray scale color palette, 4 bytes per color (R, G, B, 0x00)107 for (int i = 0; i < PALETTE_COLORS_AMOUNT; i++) {108 colorMap[i * 4] = i;109 colorMap[i * 4 + 1] = i;110 colorMap[i * 4 + 2] = i;111 }112}113
114// Save the headers and the image data into the .bmp file115void saveImage(unsigned char *imageData, const char* imagePath){116 int fileSize = BITMAP_FILE_HEADER_SIZE + DIB_HEADER_SIZE + IMAGE_WIDTH * IMAGE_HEIGHT;117 FILE *file = fopen(imagePath, "w");118
119 // Bitmap structure (Head + DIB Head + ColorMap + binary image)120 unsigned char bitmapFileHeader[BITMAP_FILE_HEADER_SIZE];121 unsigned char bitmapDIBHeader[DIB_HEADER_SIZE];122 unsigned char colorMap[PALETTE_SIZE]; // Needed for <= 8bpp grayscale bitmaps 123
124 setFileHeaders(bitmapFileHeader, bitmapDIBHeader, fileSize);125 setColorMap(colorMap);126
127 // Write the bitmap file128 fwrite(bitmapFileHeader, 1, BITMAP_FILE_HEADER_SIZE, file);129 fwrite(bitmapDIBHeader, 1, DIB_HEADER_SIZE, file);130 fwrite(colorMap, 1, PALETTE_SIZE, file);131 fwrite(imageData, 1, IMAGE_HEIGHT * IMAGE_WIDTH, file);132
133 // Close the file stream134 fclose(file);135}136
137void countDownBlink(){138 for (int i = 0; i < 6; i++){139 digitalWrite(LEDG, i % 2);140 delay(500);141 }142 digitalWrite(LEDG, HIGH);143 digitalWrite(LEDB, LOW);144}Conclusion
In this tutorial you learned how to capture frames with your Portenta Vision Shield's Camera in the Arduino IDE, encode it with the bitmap standards and save it to an SD Card.
Next Steps
With this sketch format, you could easily add some code in the
loop()image<time/count>.bmpSuggested changes
The content on docs.arduino.cc is facilitated through a public GitHub repository. You can read more on how to contribute in the contribution policy.
License
The Arduino documentation is licensed under the Creative Commons Attribution-Share Alike 4.0 license.