SPIFFS Partition on Nano ESP32
Get started with the SPIFFS partition scheme on the Nano ESP32.
The SPIFFS (Serial Peripheral Interface Flash File System) is a file system designed to be used with NOR flash memory devices and microcontrollers that support the Serial Peripheral Interface (SPI) protocol such as the ESP32 found on the Nano ESP32.
Before proceeding with the SPIFFS file system setup on Nano ESP, please be aware that the mounting instructions mentioned in a comment on the code from the packaged built-in example are tailored for specific older IDE versions such as IDE 1.8. These instructions might not be relevant to IDE 2.0, as it does not support the utilization of custom tools, which are unnecessary in this case.
Hardware & Software Needed
- Arduino Nano ESP32
- Arduino IDE
- Arduino ESP32 Board Package installed (done in the Arduino IDE).
Set Up SPIFFS File System
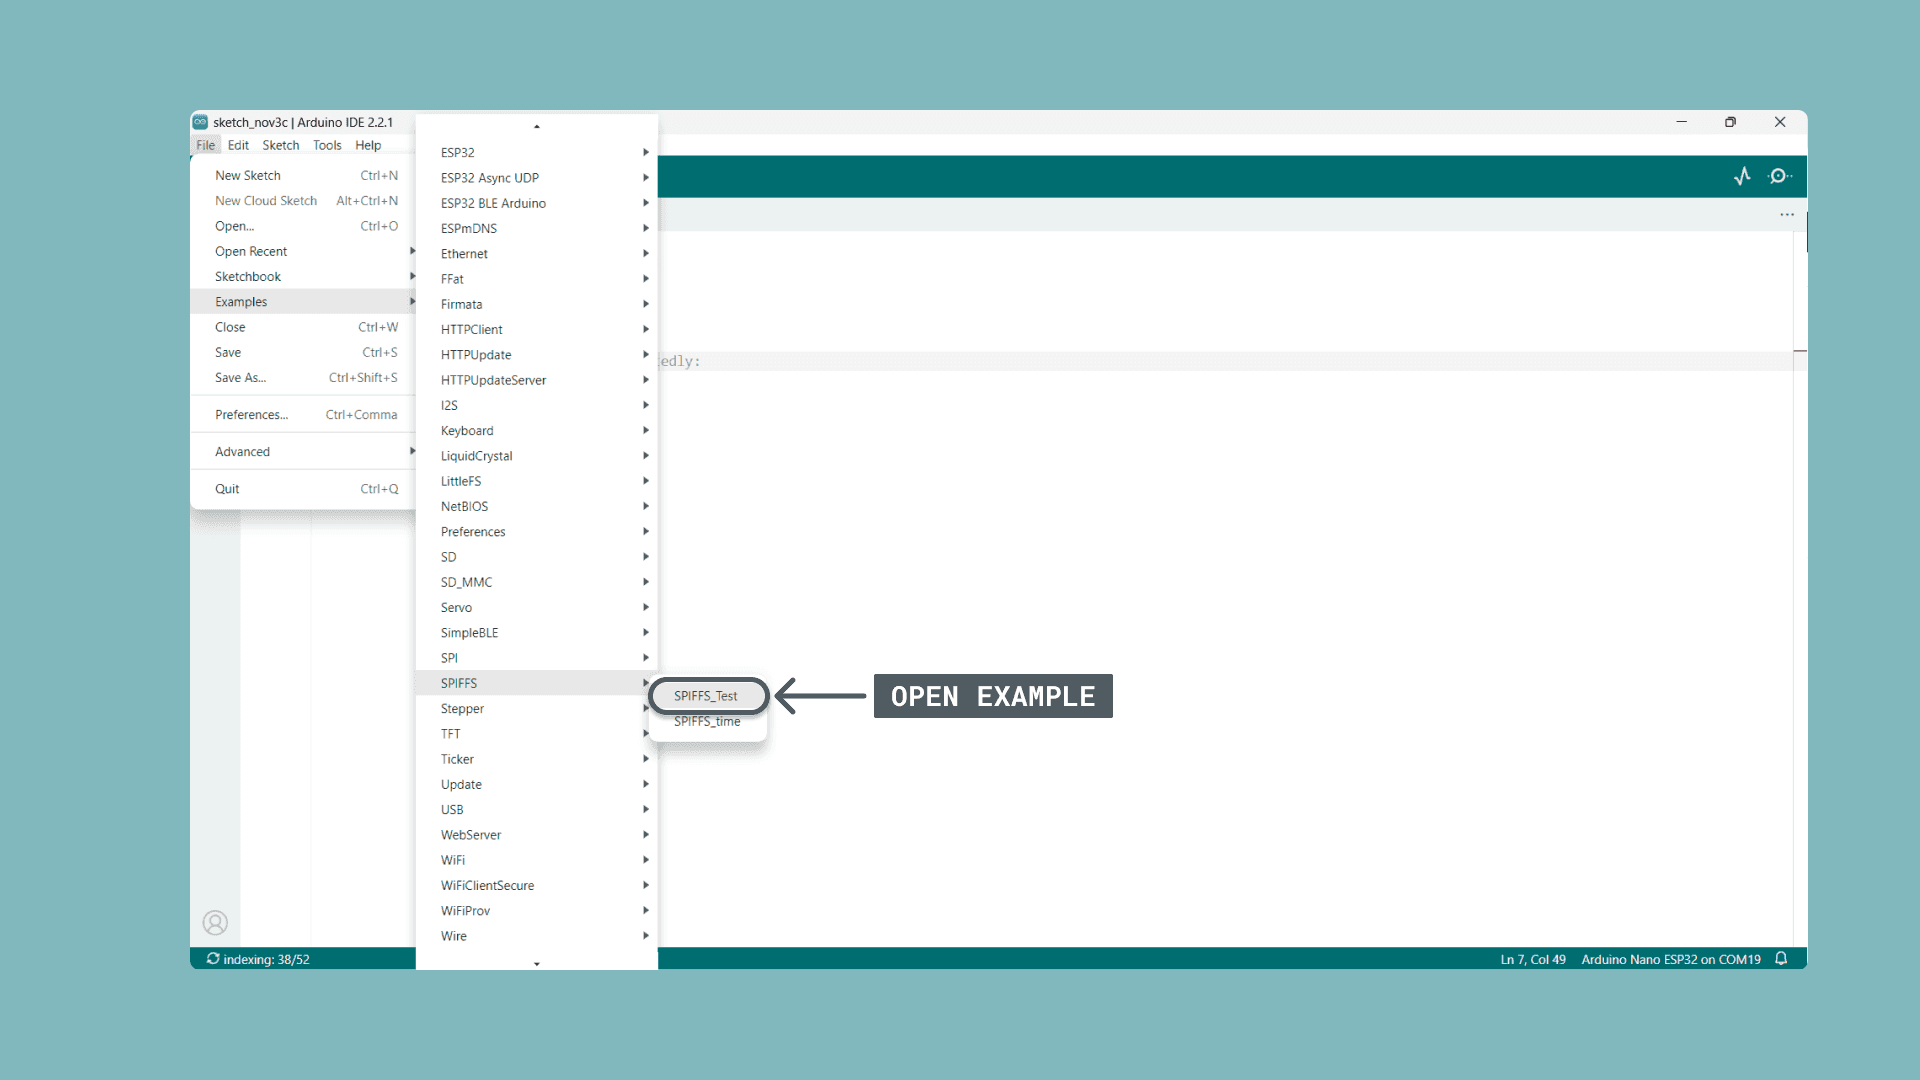
Start by opening the SPIFFS_Test example by navigating to:
- File > Examples > SPIFFS > SPIFFS_Test
The example is also included at the bottom (see Example), together with an explanation of how the code work.
Select the correct Partition Scheme by clicking:
- Tools > Partition Scheme > With SPIFFS partition (advanced)

Prepare your following these steps:
Take your unplugged board and connect a jumper cable between the GND and B1 pins.
Plug it in and the RGB LED will turn on with a green or blue color.
While the GND and B1 pins are shorted, press the white RST button on the top of the board to reset the board.
Remove the jumper cable. The RGB LED should stay on, in a purple or yellow color.
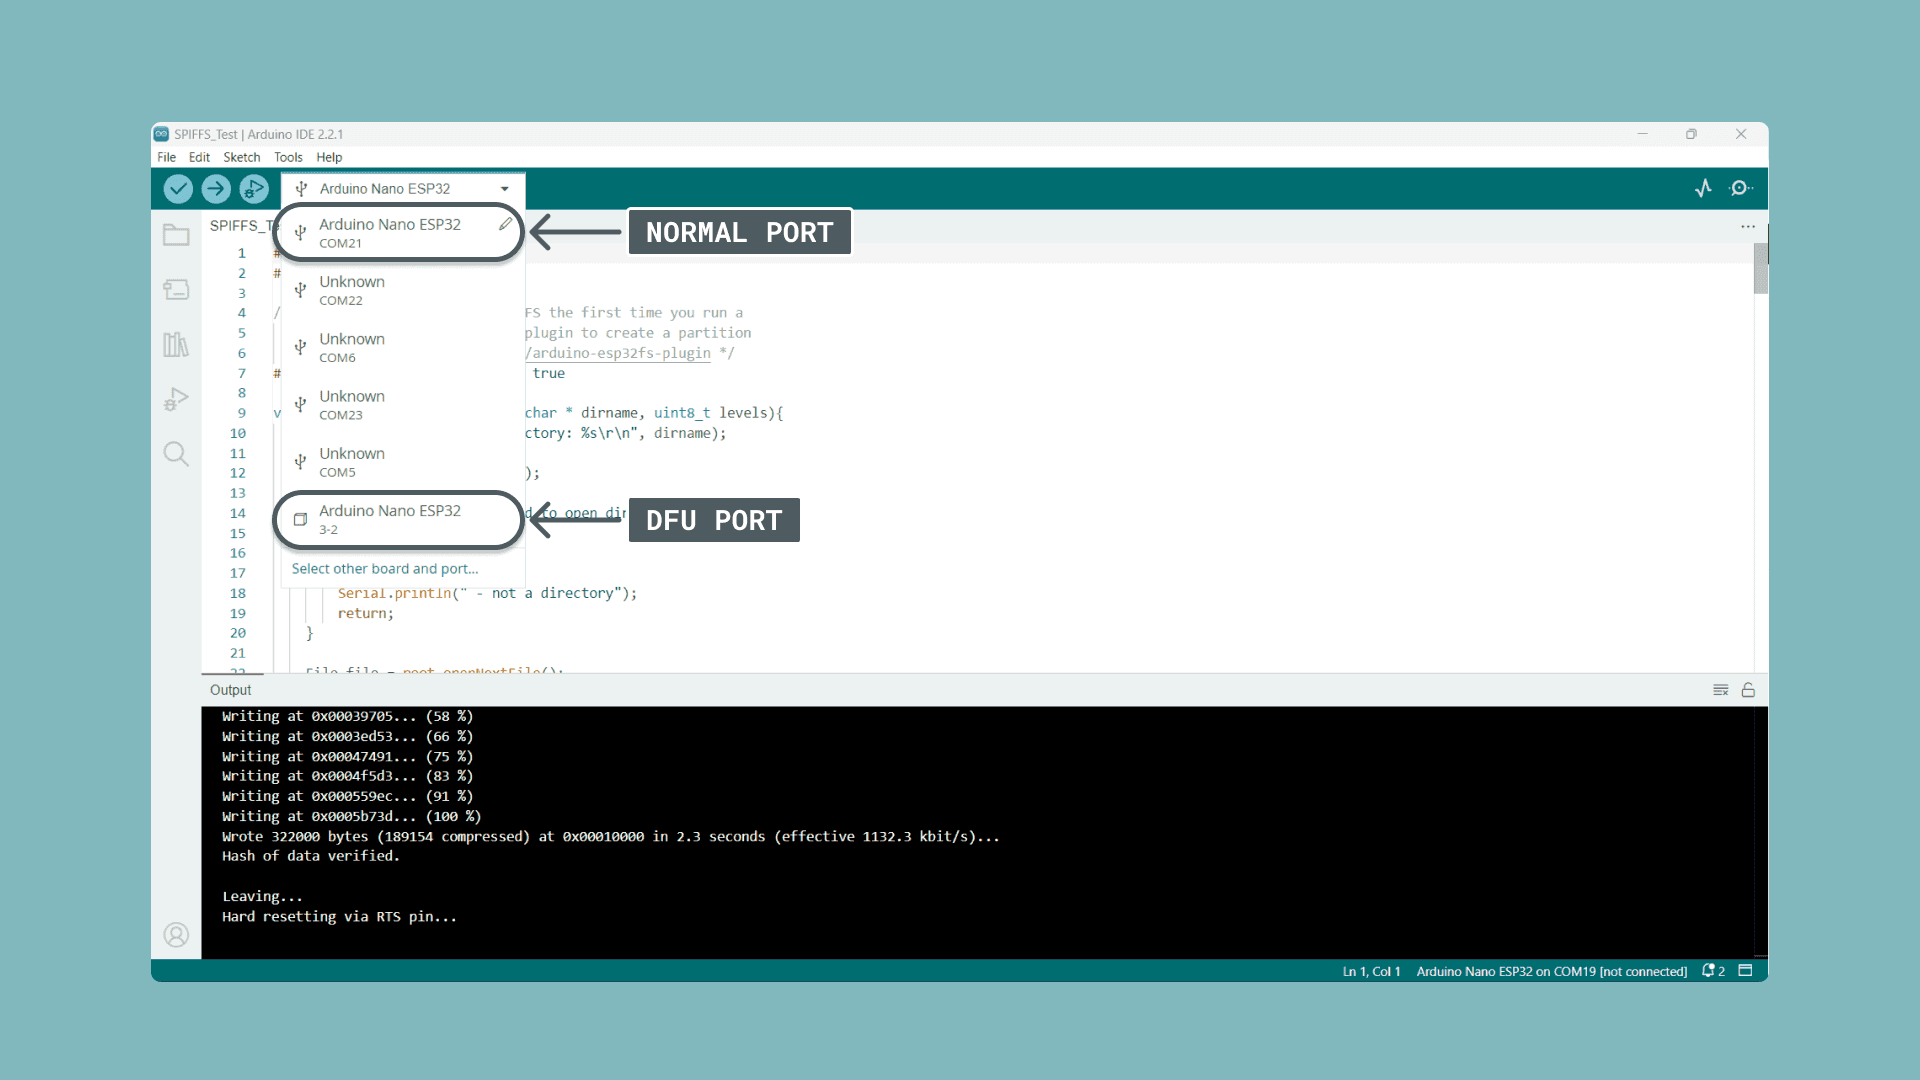
Select the correct port:

If your board shows up as a generic ESP32 device go to Tools > Board and select "Arduino Nano ESP32" as well as the correct port under Tools > Port.
Select the Esptool as Programmer by going to:
- Tools > Programmer > Esptool

Burn the bootloader by clicking:
- Tools > Burn Bootloader

We have now successfully changed the partition scheme and the final step is to upload a sketch using programmer and reset the board.
Upload the sketch via Using Programmer by going to:
- Sketch > Upload Using Programmer

After the successful upload press the white RST button on the top of the board. You should see two ports in the drop-down menu, one showing a USB symbol and another one showing a cube.
Select the port next to the USB symbol.
Open the serial monitor and you should see the following output:
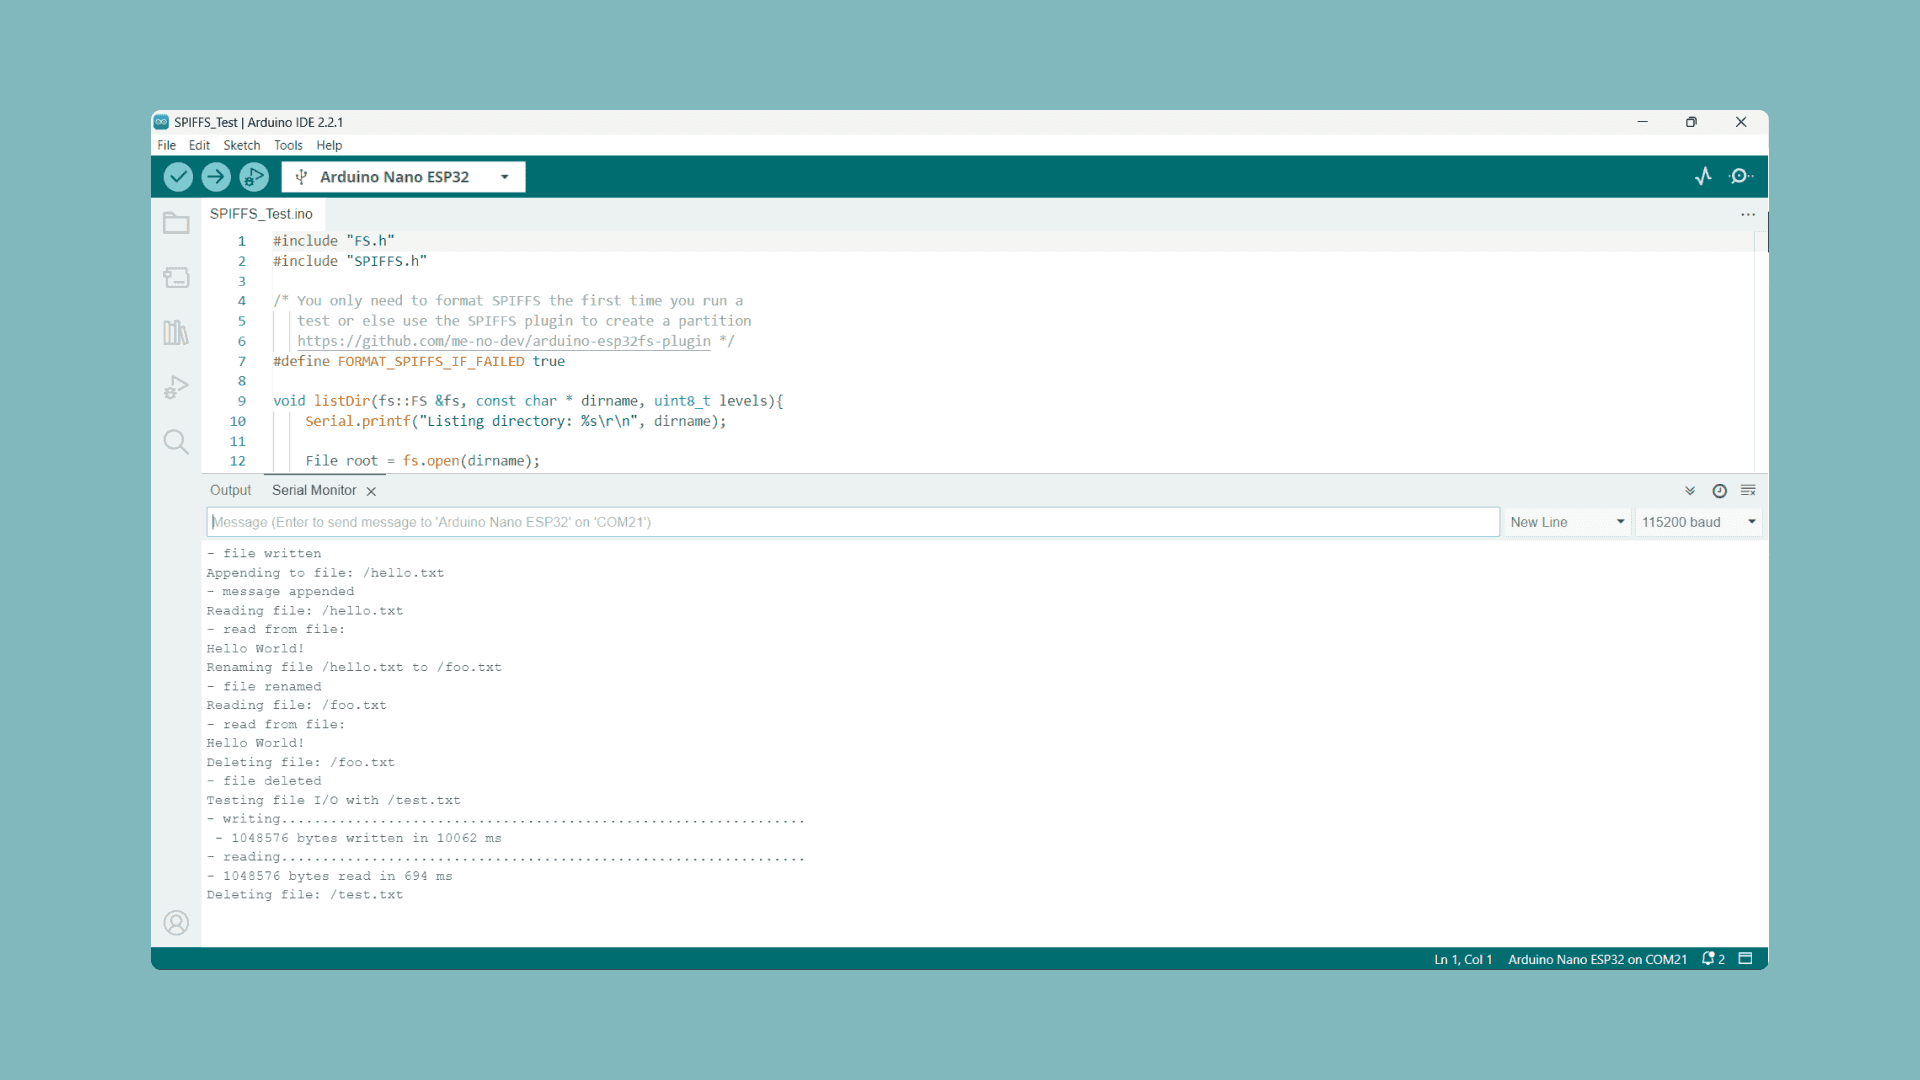
Note: It might take a short while for the messages to be printed. If you don't see any messages after one minute repeat the process.
Example
As mentioned above the code is taken from File > Examples > SPIFFS > SPIFFS_Test and can also be found inside the IDE's example section. It showcases different features available when using the SPIFSF file system.
1#include "FS.h"2#include "SPIFFS.h"3
4/* You only need to format SPIFFS the first time you run a5 test or else use the SPIFFS plugin to create a partition6 https://github.com/me-no-dev/arduino-esp32fs-plugin */7#define FORMAT_SPIFFS_IF_FAILED true8
9void listDir(fs::FS &fs, const char * dirname, uint8_t levels){10 Serial.printf("Listing directory: %s\r\n", dirname);11
12 File root = fs.open(dirname);13 if(!root){14 Serial.println("- failed to open directory");15 return;16 }17 if(!root.isDirectory()){18 Serial.println(" - not a directory");19 return;20 }21
22 File file = root.openNextFile();23 while(file){24 if(file.isDirectory()){25 Serial.print(" DIR : ");26 Serial.println(file.name());27 if(levels){28 listDir(fs, file.path(), levels -1);29 }30 } else {31 Serial.print(" FILE: ");32 Serial.print(file.name());33 Serial.print("\tSIZE: ");34 Serial.println(file.size());35 }36 file = root.openNextFile();37 }38}39
40void readFile(fs::FS &fs, const char * path){41 Serial.printf("Reading file: %s\r\n", path);42
43 File file = fs.open(path);44 if(!file || file.isDirectory()){45 Serial.println("- failed to open file for reading");46 return;47 }48
49 Serial.println("- read from file:");50 while(file.available()){51 Serial.write(file.read());52 }53 file.close();54}55
56void writeFile(fs::FS &fs, const char * path, const char * message){57 Serial.printf("Writing file: %s\r\n", path);58
59 File file = fs.open(path, FILE_WRITE);60 if(!file){61 Serial.println("- failed to open file for writing");62 return;63 }64 if(file.print(message)){65 Serial.println("- file written");66 } else {67 Serial.println("- write failed");68 }69 file.close();70}71
72void appendFile(fs::FS &fs, const char * path, const char * message){73 Serial.printf("Appending to file: %s\r\n", path);74
75 File file = fs.open(path, FILE_APPEND);76 if(!file){77 Serial.println("- failed to open file for appending");78 return;79 }80 if(file.print(message)){81 Serial.println("- message appended");82 } else {83 Serial.println("- append failed");84 }85 file.close();86}87
88void renameFile(fs::FS &fs, const char * path1, const char * path2){89 Serial.printf("Renaming file %s to %s\r\n", path1, path2);90 if (fs.rename(path1, path2)) {91 Serial.println("- file renamed");92 } else {93 Serial.println("- rename failed");94 }95}96
97void deleteFile(fs::FS &fs, const char * path){98 Serial.printf("Deleting file: %s\r\n", path);99 if(fs.remove(path)){100 Serial.println("- file deleted");101 } else {102 Serial.println("- delete failed");103 }104}105
106void testFileIO(fs::FS &fs, const char * path){107 Serial.printf("Testing file I/O with %s\r\n", path);108
109 static uint8_t buf[512];110 size_t len = 0;111 File file = fs.open(path, FILE_WRITE);112 if(!file){113 Serial.println("- failed to open file for writing");114 return;115 }116
117 size_t i;118 Serial.print("- writing" );119 uint32_t start = millis();120 for(i=0; i<2048; i++){121 if ((i & 0x001F) == 0x001F){122 Serial.print(".");123 }124 file.write(buf, 512);125 }126 Serial.println("");127 uint32_t end = millis() - start;128 Serial.printf(" - %u bytes written in %u ms\r\n", 2048 * 512, end);129 file.close();130
131 file = fs.open(path);132 start = millis();133 end = start;134 i = 0;135 if(file && !file.isDirectory()){136 len = file.size();137 size_t flen = len;138 start = millis();139 Serial.print("- reading" );140 while(len){141 size_t toRead = len;142 if(toRead > 512){143 toRead = 512;144 }145 file.read(buf, toRead);146 if ((i++ & 0x001F) == 0x001F){147 Serial.print(".");148 }149 len -= toRead;150 }151 Serial.println("");152 end = millis() - start;153 Serial.printf("- %u bytes read in %u ms\r\n", flen, end);154 file.close();155 } else {156 Serial.println("- failed to open file for reading");157 }158}159
160void setup(){161 Serial.begin(115200);162 if(!SPIFFS.begin(FORMAT_SPIFFS_IF_FAILED)){163 Serial.println("SPIFFS Mount Failed");164 return;165 }166 167 listDir(SPIFFS, "/", 0);168 writeFile(SPIFFS, "/hello.txt", "Hello ");169 appendFile(SPIFFS, "/hello.txt", "World!\r\n");170 readFile(SPIFFS, "/hello.txt");171 renameFile(SPIFFS, "/hello.txt", "/foo.txt");172 readFile(SPIFFS, "/foo.txt");173 deleteFile(SPIFFS, "/foo.txt");174 testFileIO(SPIFFS, "/test.txt");175 deleteFile(SPIFFS, "/test.txt");176 Serial.println( "Test complete" );177}178
179void loop(){180
181}How It Works?
- First, the necessary libraries are included:
1#include "FS.h"2#include "SPIFFS.h"- The constant
is used to specify whether the SPIFFS file system should be formatted if it fails to mount. If it'sFORMAT_SPIFFS_IF_FAILED
, the file system will be formatted:true
1#define FORMAT_SPIFFS_IF_FAILED trueThe code consists of several functions defined in the code showcasing different features such as:
= List Filesvoid listDir()
= Read Filesvoid readFile()
= Write Filesvoid writeFile()
= Append a message to an existing filevoid appendFile()
= Rename Filesvoid renameFile()
= Delete Filesvoid deleteFile()
= Testing a file's input and output by writing a large amount of data and then reading it.void testFileIO()Before calling all the functions mentioned above two things are done inside
:setup()
- The serial communication is initialized with a baud rate of 115200.
- The SPIFFS file system is mounted and if
isFORMAT_SPIFFS_IF_FAILED
it's formatted.true
1void setup(){2 Serial.begin(115200);3 if(!SPIFFS.begin(FORMAT_SPIFFS_IF_FAILED)){4 Serial.println("SPIFFS Mount Failed");5 return;6 }7 ...8}Lastly, all functions are called with parameters:
1void setup(){2 Serial.begin(115200);3 if(!SPIFFS.begin(FORMAT_SPIFFS_IF_FAILED)){4 Serial.println("SPIFFS Mount Failed");5 return;6 }7 8 listDir(SPIFFS, "/", 0);9 writeFile(SPIFFS, "/hello.txt", "Hello ");10 appendFile(SPIFFS, "/hello.txt", "World!\r\n");11 readFile(SPIFFS, "/hello.txt");12 renameFile(SPIFFS, "/hello.txt", "/foo.txt");13 readFile(SPIFFS, "/foo.txt");14 deleteFile(SPIFFS, "/foo.txt");15 testFileIO(SPIFFS, "/test.txt");16 deleteFile(SPIFFS, "/test.txt");17 Serial.println( "Test complete" );18}- All messages printed on the serial monitor are defined in the respective function, except "Test Complete" which printed by
once everything is done.setup()
Suggested changes
The content on docs.arduino.cc is facilitated through a public GitHub repository. You can read more on how to contribute in the contribution policy.
License
The Arduino documentation is licensed under the Creative Commons Attribution-Share Alike 4.0 license.