MKR NB Library Examples
A series of examples related to the MKRNB Library, which can be used to send data over the LTE Cat M1/NB1 bands, make voice calls, and sending SMS, using a enabled SIM card.
The Arduino MKR NB 1500 is a powerful IoT board that can communicate over LTE-M, NB-IoT and EGPRS networks. In this article, you will find a lot of useful examples, such as sending SMS, making voice calls and making http requests. All examples are available in the MKRNB library, which is available for download through the Arduino IDE library manager.
You can also visit the MKRGSM GitHub repository to learn more about this library.
Hardware Required
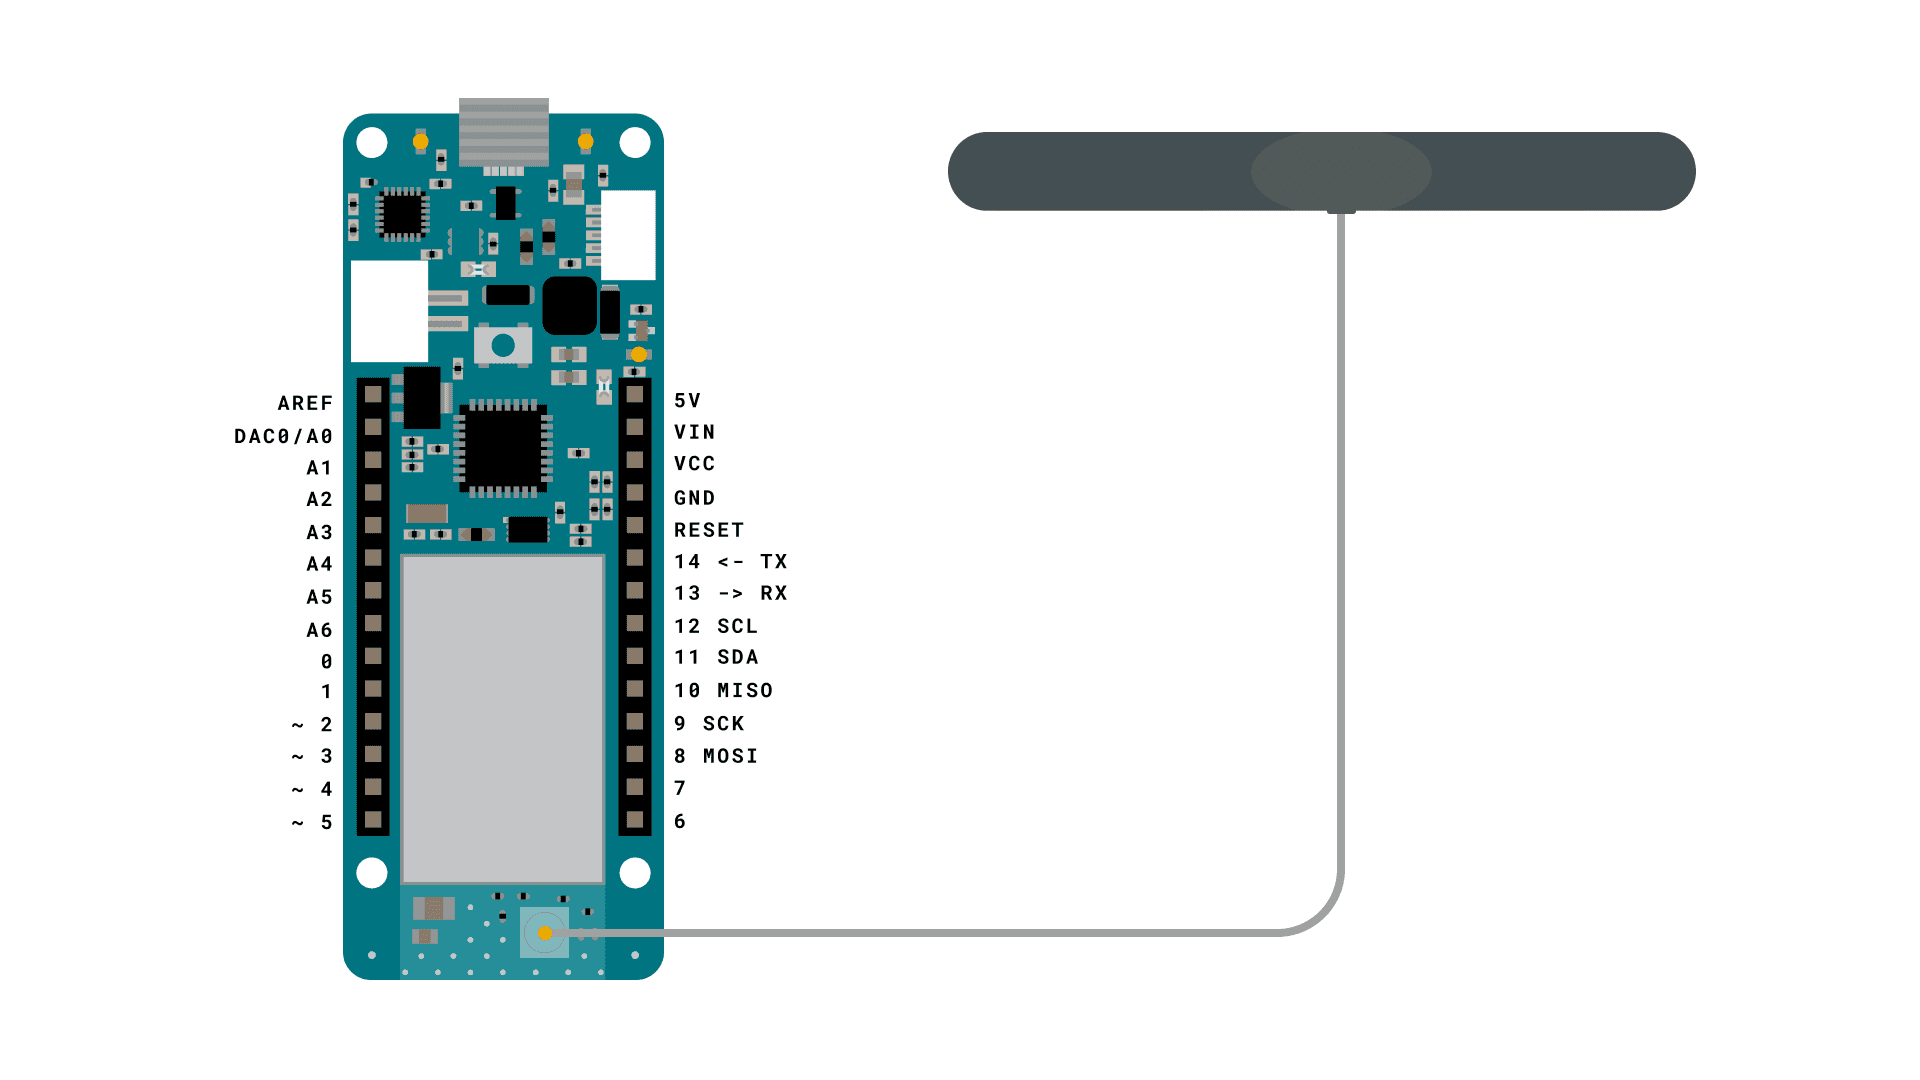
- Arduino MKR NB 1500
- Antenna
- SIM card enable for Data
Circuit
Examples
MKR NB GPRS Udp Ntp Client
In this example, you will use your MKR NB 1500, to query a Network Time Protocol (NTP) server. In this way, your board can get the time from the Internet.
1/*2
3 Udp NTP Client4
5 Get the time from a Network Time Protocol (NTP) time server6
7 Demonstrates use of UDP sendPacket and ReceivePacket8
9 For more on NTP time servers and the messages needed to communicate with them,10
11 see http://en.wikipedia.org/wiki/Network_Time_Protocol12
13 created 4 Sep 201014
15 by Michael Margolis16
17 modified 9 Apr 201218
19 by Tom Igoe20
21 modified 6 Dec 2017 ported from WiFi101 to MKRGSM22
23 by Arturo Guadalupi24
25
26
27 This code is in the public domain.28
29*/30
31#include <MKRNB.h>32
33#include "arduino_secrets.h"34// Please enter your sensitive data in the Secret tab or arduino_secrets.h35// PIN Number36
37const char PINNUMBER[] = SECRET_PINNUMBER;38
39unsigned int localPort = 2390; // local port to listen for UDP packets40
41IPAddress timeServer(129, 6, 15, 28); // time.nist.gov NTP server42
43const int NTP_PACKET_SIZE = 48; // NTP time stamp is in the first 48 bytes of the message44
45byte packetBuffer[ NTP_PACKET_SIZE]; //buffer to hold incoming and outgoing packets46
47// initialize the library instance48
49NBClient client;50
51GPRS gprs;52
53NB nbAccess;54
55// A UDP instance to let us send and receive packets over UDP56
57NBUDP Udp;58
59void setup()60{61
62 // Open serial communications and wait for port to open:63
64 Serial.begin(9600);65
66 while (!Serial) {67
68 ; // wait for serial port to connect. Needed for native USB port only69
70 }71
72 Serial.println("Starting Arduino GPRS NTP client.");73
74 // connection state75
76 boolean connected = false;77
78 // After starting the modem with NB.begin()79
80 // attach the shield to the GPRS network with the APN, login and password81
82 while (!connected) {83
84 if ((nbAccess.begin(PINNUMBER) == NB_READY) &&85
86 (gprs.attachGPRS() == GPRS_READY)) {87
88 connected = true;89
90 } else {91
92 Serial.println("Not connected");93
94 delay(1000);95
96 }97
98 }99
100 Serial.println("\nStarting connection to server...");101
102 Udp.begin(localPort);103}104
105void loop()106{107
108 sendNTPpacket(timeServer); // send an NTP packet to a time server109
110 // wait to see if a reply is available111
112 delay(1000);113
114 if ( Udp.parsePacket() ) {115
116 Serial.println("packet received");117
118 // We've received a packet, read the data from it119
120 Udp.read(packetBuffer, NTP_PACKET_SIZE); // read the packet into the buffer121
122 //the timestamp starts at byte 40 of the received packet and is four bytes,123
124 // or two words, long. First, esxtract the two words:125
126 unsigned long highWord = word(packetBuffer[40], packetBuffer[41]);127
128 unsigned long lowWord = word(packetBuffer[42], packetBuffer[43]);129
130 // combine the four bytes (two words) into a long integer131
132 // this is NTP time (seconds since Jan 1 1900):133
134 unsigned long secsSince1900 = highWord << 16 | lowWord;135
136 Serial.print("Seconds since Jan 1 1900 = " );137
138 Serial.println(secsSince1900);139
140 // now convert NTP time into everyday time:141
142 Serial.print("Unix time = ");143
144 // Unix time starts on Jan 1 1970. In seconds, that's 2208988800:145
146 const unsigned long seventyYears = 2208988800UL;147
148 // subtract seventy years:149
150 unsigned long epoch = secsSince1900 - seventyYears;151
152 // print Unix time:153
154 Serial.println(epoch);155
156 // print the hour, minute and second:157
158 Serial.print("The UTC time is "); // UTC is the time at Greenwich Meridian (GMT)159
160 Serial.print((epoch % 86400L) / 3600); // print the hour (86400 equals secs per day)161
162 Serial.print(':');163
164 if ( ((epoch % 3600) / 60) < 10 ) {165
166 // In the first 10 minutes of each hour, we'll want a leading '0'167
168 Serial.print('0');169
170 }171
172 Serial.print((epoch % 3600) / 60); // print the minute (3600 equals secs per minute)173
174 Serial.print(':');175
176 if ( (epoch % 60) < 10 ) {177
178 // In the first 10 seconds of each minute, we'll want a leading '0'179
180 Serial.print('0');181
182 }183
184 Serial.println(epoch % 60); // print the second185
186 }187
188 // wait ten seconds before asking for the time again189
190 delay(10000);191}192
193// send an NTP request to the time server at the given address194unsigned long sendNTPpacket(IPAddress& address)195{196
197 //Serial.println("1");198
199 // set all bytes in the buffer to 0200
201 memset(packetBuffer, 0, NTP_PACKET_SIZE);202
203 // Initialize values needed to form NTP request204
205 // (see URL above for details on the packets)206
207 //Serial.println("2");208
209 packetBuffer[0] = 0b11100011; // LI, Version, Mode210
211 packetBuffer[1] = 0; // Stratum, or type of clock212
213 packetBuffer[2] = 6; // Polling Interval214
215 packetBuffer[3] = 0xEC; // Peer Clock Precision216
217 // 8 bytes of zero for Root Delay & Root Dispersion218
219 packetBuffer[12] = 49;220
221 packetBuffer[13] = 0x4E;222
223 packetBuffer[14] = 49;224
225 packetBuffer[15] = 52;226
227 //Serial.println("3");228
229 // all NTP fields have been given values, now230
231 // you can send a packet requesting a timestamp:232
233 Udp.beginPacket(address, 123); //NTP requests are to port 123234
235 //Serial.println("4");236
237 Udp.write(packetBuffer, NTP_PACKET_SIZE);238
239 //Serial.println("5");240
241 Udp.endPacket();242
243 //Serial.println("6");244}MKR NB NBSSL Web Client
This sketch connects an Arduino MKR NB 1500 board to https://example.org, through the NB network. It then prints the content of the page through the serial monitor of the Arduino Software (IDE).
Before you start, please double check with your cellular company if they allow connections to the "Open Internet" (means that you can connect to every website).
NB and CATM1 connectivity access can be restricted to some endpoints for security reasons.
1/*2
3 SSL Web client4
5 This sketch connects to a website using SSL through a MKR NB 1500 board. Specifically,6
7 this example downloads the URL "https://www.arduino.cc/asciilogo.txt" and8
9 prints it to the Serial monitor.10
11 Circuit:12
13 * MKR NB 1500 board14
15 * Antenna16
17 * SIM card with a data plan18
19 created 8 Mar 201220
21 by Tom Igoe22
23*/24
25// libraries26#include <MKRNB.h>27
28#include "arduino_secrets.h"29// Please enter your sensitive data in the Secret tab or arduino_secrets.h30// PIN Number31
32const char PINNUMBER[] = SECRET_PINNUMBER;33
34// initialize the library instance35
36NBSSLClient client;37
38GPRS gprs;39
40NB nbAccess;41
42// URL, path and port (for example: arduino.cc)43char server[] = "arduino.cc";44char path[] = "/asciilogo.txt";45int port = 443; // port 443 is the default for HTTPS46
47void setup() {48
49 // initialize serial communications and wait for port to open:50
51 Serial.begin(9600);52
53 while (!Serial) {54
55 ; // wait for serial port to connect. Needed for native USB port only56
57 }58
59 Serial.println("Starting Arduino web client.");60
61 // connection state62
63 boolean connected = false;64
65 // After starting the modem with NB.begin()66
67 // attach to the GPRS network with the APN, login and password68
69 while (!connected) {70
71 if ((nbAccess.begin(PINNUMBER) == NB_READY) &&72
73 (gprs.attachGPRS() == GPRS_READY)) {74
75 connected = true;76
77 } else {78
79 Serial.println("Not connected");80
81 delay(1000);82
83 }84
85 }86
87 Serial.println("connecting...");88
89 // if you get a connection, report back via serial:90
91 if (client.connect(server, port)) {92
93 Serial.println("connected");94
95 // Make a HTTP request:96
97 client.print("GET ");98
99 client.print(path);100
101 client.println(" HTTP/1.1");102
103 client.print("Host: ");104
105 client.println(server);106
107 client.println("Connection: close");108
109 client.println();110
111 } else {112
113 // if you didn't get a connection to the server:114
115 Serial.println("connection failed");116
117 }118}119
120void loop() {121
122 // if there are incoming bytes available123
124 // from the server, read them and print them:125
126 if (client.available()) {127
128 char c = client.read();129
130 Serial.print(c);131
132 }133
134 // if the server's disconnected, stop the client:135
136 if (!client.available() && !client.connected()) {137
138 Serial.println();139
140 Serial.println("disconnecting.");141
142 client.stop();143
144 // do nothing forevermore:145
146 for (;;)147
148 ;149
150 }151}MKR NB NB Web Client
This sketch connects an Arduino MKR NB 1500 board to the Arduino homepage, http://arduino.cc, through the NB network. It then prints the content of the page through the serial monitor of the Arduino Software (IDE).
1/*2
3 Web client4
5 This sketch connects to a website through a MKR NB 1500 board. Specifically,6
7 this example downloads the URL "http://example.org/" and8
9 prints it to the Serial monitor.10
11 Circuit:12
13 - MKR NB 1500 board14
15 - Antenna16
17 - SIM card with a data plan18
19 created 8 Mar 201220
21 by Tom Igoe22
23*/24
25// libraries26#include <MKRNB.h>27
28#include "arduino_secrets.h"29// Please enter your sensitive data in the Secret tab or arduino_secrets.h30// PIN Number31
32const char PINNUMBER[] = SECRET_PINNUMBER;33
34// initialize the library instance35
36NBClient client;37
38GPRS gprs;39
40NB nbAccess;41
42// URL, path and port (for example: example.org)43char server[] = "example.org";44char path[] = "/";45int port = 80; // port 80 is the default for HTTP46
47void setup() {48
49 // initialize serial communications and wait for port to open:50
51 Serial.begin(9600);52
53 while (!Serial) {54
55 ; // wait for serial port to connect. Needed for native USB port only56
57 }58
59 Serial.println("Starting Arduino web client.");60
61 // connection state62
63 boolean connected = false;64
65 // After starting the modem with NB.begin()66
67 // attach to the GPRS network with the APN, login and password68
69 while (!connected) {70
71 if ((nbAccess.begin(PINNUMBER) == NB_READY) &&72
73 (gprs.attachGPRS() == GPRS_READY)) {74
75 connected = true;76
77 } else {78
79 Serial.println("Not connected");80
81 delay(1000);82
83 }84
85 }86
87 Serial.println("connecting...");88
89 // if you get a connection, report back via serial:90
91 if (client.connect(server, port)) {92
93 Serial.println("connected");94
95 // Make a HTTP request:96
97 client.print("GET ");98
99 client.print(path);100
101 client.println(" HTTP/1.1");102
103 client.print("Host: ");104
105 client.println(server);106
107 client.println("Connection: close");108
109 client.println();110
111 } else {112
113 // if you didn't get a connection to the server:114
115 Serial.println("connection failed");116
117 }118}119
120void loop() {121
122 // if there are incoming bytes available123
124 // from the server, read them and print them:125
126 if (client.available()) {127
128 Serial.print((char)client.read());129
130 }131
132 // if the server's disconnected, stop the client:133
134 if (!client.available() && !client.connected()) {135
136 Serial.println();137
138 Serial.println("disconnecting.");139
140 client.stop();141
142 // do nothing forevermore:143
144 for (;;)145
146 ;147
148 }149}MKR NB Scan Networks
This example prints out the IMEI number of the modem, then checks to see if it's connected to a carrier and prints out its signal strength. It also scans for all nearby networks.
1/*2
3 NB Scan Networks4
5 This example prints out the IMEI number of the modem,6
7 then checks to see if it's connected to a carrier.8
9 Then it scans for nearby networks and prints out their signal strengths.10
11 Circuit:12
13 * MKR NB 1500 board14
15 * Antenna16
17 * SIM card18
19 Created 8 Mar 201220
21 by Tom Igoe, implemented by Javier Carazo22
23 Modified 4 Feb 201324
25 by Scott Fitzgerald26
27*/28
29// libraries30#include <MKRNB.h>31
32#include "arduino_secrets.h"33// Please enter your sensitive data in the Secret tab or arduino_secrets.h34// PIN Number35
36const char PINNUMBER[] = SECRET_PINNUMBER;37
38// initialize the library instance39
40NB nbAccess; // include a 'true' parameter to enable debugging41
42NBScanner scannerNetworks;43
44NBModem modemTest;45
46// Save data variables47
48String IMEI = "";49
50// serial monitor result messages51
52String errortext = "ERROR";53
54void setup() {55
56 // initialize serial communications and wait for port to open:57
58 Serial.begin(9600);59
60 while (!Serial) {61
62 ; // wait for serial port to connect. Needed for Leonardo only63
64 }65
66 Serial.println("NB IoT/LTE Cat M1 networks scanner");67
68 scannerNetworks.begin();69
70 // connection state71
72 boolean connected = false;73
74 // Start module75
76 // If your SIM has PIN, pass it as a parameter of begin() in quotes77
78 while (!connected) {79
80 if (nbAccess.begin(PINNUMBER) == NB_READY) {81
82 connected = true;83
84 } else {85
86 Serial.println("Not connected");87
88 delay(1000);89
90 }91
92 }93
94 // get modem parameters95
96 // IMEI, modem unique identifier97
98 Serial.print("Modem IMEI: ");99
100 IMEI = modemTest.getIMEI();101
102 IMEI.replace("\n", "");103
104 if (IMEI != NULL) {105
106 Serial.println(IMEI);107
108 }109}110
111void loop() {112
113 // currently connected carrier114
115 Serial.print("Current carrier: ");116
117 Serial.println(scannerNetworks.getCurrentCarrier());118
119 // returns strength and ber120
121 // signal strength in 0-31 scale. 31 means power > 51dBm122
123 // BER is the Bit Error Rate. 0-7 scale. 99=not detectable124
125 Serial.print("Signal Strength: ");126
127 Serial.print(scannerNetworks.getSignalStrength());128
129 Serial.println(" [0-31]");130
131 // scan for existing networks, displays a list of networks132
133 Serial.println("Scanning available networks. May take some seconds.");134
135 Serial.println(scannerNetworks.readNetworks());136
137 // wait ten seconds before scanning again138
139 delay(10000);140}MKR NB Pin Management
This example is part of the tools supplied for the Arduino MKR NB 1500 and helps you change or remove the PIN of a SIM card.
1/*2
3 This example enables you to change or remove the PIN number of4
5 a SIM card inserted into a MKR NB 1500 board.6
7 Circuit:8
9 * MKR NB 1500 board10
11 * Antenna12
13 * SIM card14
15 Created 12 Jun 201216
17 by David del Peral18
19*/20
21// libraries22#include <MKRNB.h>23
24// pin manager object25
26NBPIN PINManager;27
28// save input in serial by user29
30String user_input = "";31
32// authenticated with PIN code33boolean auth = false;34
35// serial monitor result messages36
37String oktext = "OK";38
39String errortext = "ERROR";40
41void setup() {42
43 // initialize serial communications and wait for port to open:44
45 Serial.begin(9600);46
47 while (!Serial) {48
49 ; // wait for serial port to connect. Needed for Leonardo only50
51 }52
53 Serial.println("Change PIN example\n");54
55 PINManager.begin();56
57 // check if the SIM have pin lock58
59 while (!auth) {60
61 int pin_query = PINManager.isPIN();62
63 if (pin_query == 1) {64
65 // if SIM is locked, enter PIN code66
67 Serial.print("Enter PIN code: ");68
69 user_input = readSerial();70
71 // check PIN code72
73 if (PINManager.checkPIN(user_input) == 0) {74
75 auth = true;76
77 PINManager.setPINUsed(true);78
79 Serial.println(oktext);80
81 } else {82
83 // if PIN code was incorrected84
85 Serial.println("Incorrect PIN. Remember that you have 3 opportunities.");86
87 }88
89 } else if (pin_query == -1) {90
91 // PIN code is locked, user must enter PUK code92
93 Serial.println("PIN locked. Enter PUK code: ");94
95 String puk = readSerial();96
97 Serial.print("Now, enter a new PIN code: ");98
99 user_input = readSerial();100
101 // check PUK code102
103 if (PINManager.checkPUK(puk, user_input) == 0) {104
105 auth = true;106
107 PINManager.setPINUsed(true);108
109 Serial.println(oktext);110
111 } else {112
113 // if PUK o the new PIN are incorrect114
115 Serial.println("Incorrect PUK or invalid new PIN. Try again!.");116
117 }118
119 } else if (pin_query == -2) {120
121 // the worst case, PIN and PUK are locked122
123 Serial.println("PIN and PUK locked. Use PIN2/PUK2 in a mobile phone.");124
125 while (true);126
127 } else {128
129 // SIM does not requires authentication130
131 Serial.println("No pin necessary.");132
133 auth = true;134
135 }136
137 }138
139 // start module140
141 Serial.print("Checking register in NB IoT / LTE Cat M1 network...");142
143 if (PINManager.checkReg() == 0) {144
145 Serial.println(oktext);146
147 }148
149 // if you are connect by roaming150
151 else if (PINManager.checkReg() == 1) {152
153 Serial.println("ROAMING " + oktext);154
155 } else {156
157 // error connection158
159 Serial.println(errortext);160
161 while (true);162
163 }164}165
166void loop() {167
168 // Function loop implements pin management user menu169
170 // Only if you SIM use pin lock, you can change PIN code171
172 // user_op variables save user option173
174 Serial.println("Choose an option:\n1 - On/Off PIN.");175
176 if (PINManager.getPINUsed()) {177
178 Serial.println("2 - Change PIN.");179
180 }181
182 String user_op = readSerial();183
184 if (user_op == "1") {185
186 Serial.println("Enter your PIN code:");187
188 user_input = readSerial();189
190 // activate/deactivate PIN lock191
192 PINManager.switchPIN(user_input);193
194 } else if (user_op == "2" && PINManager.getPINUsed()) {195
196 Serial.println("Enter your actual PIN code:");197
198 String oldPIN = readSerial();199
200 Serial.println("Now, enter your new PIN code:");201
202 String newPIN = readSerial();203
204 // change PIN205
206 PINManager.changePIN(oldPIN, newPIN);207
208 } else {209
210 Serial.println("Incorrect option. Try again!.");211
212 }213
214 delay(1000);215}216
217/*218
219 Read input serial220
221 */222
223String readSerial() {224
225 String text = "";226
227 while (1) {228
229 while (Serial.available() > 0) {230
231 char inChar = Serial.read();232
233 if (inChar == '\n') {234
235 return text;236
237 }238
239 if (inChar != '\r') {240
241 text += inChar;242
243 }244
245 }246
247 }248}MKR NB Test GPRS
This sketch tests the GPRS data connection on the Arduino MKR NB 1500. It tries to connect to arduino.cc.
To use a data connection with the MKR NB 1500, you'll need your provider's Access Point Name (APN), login, and password. To obtain this information, contact the network provider for the most up to date information. This page has some information about various carrier settings, but it may not be current.
1/*2
3 This sketch test the MKR NB 1500 board's ability to connect to a4
5 GPRS network. It asks for APN information through the6
7 serial monitor and tries to connect to example.org.8
9 Circuit:10
11 * MKR NB 1500 board12
13 * Antenna14
15 * SIM card with data plan16
17 Created 18 Jun 201218
19 by David del Peral20
21*/22
23// libraries24#include <MKRNB.h>25
26#include "arduino_secrets.h"27// Please enter your sensitive data in the Secret tab or arduino_secrets.h28// PIN Number29
30const char PINNUMBER[] = SECRET_PINNUMBER;31
32// initialize the library instance33
34NB nbAccess; // NB access: include a 'true' parameter for debug enabled35
36GPRS gprsAccess; // GPRS access37
38NBClient client; // Client service for TCP connection39
40// messages for serial monitor response41
42String oktext = "OK";43
44String errortext = "ERROR";45
46// URL and path (for example: example.org)47char url[] = "example.org";48char urlproxy[] = "http://example.org";49char path[] = "/";50
51// variable for save response obtained52
53String response = "";54
55// use a proxy56boolean use_proxy = false;57
58void setup() {59
60 // initialize serial communications and wait for port to open:61
62 Serial.begin(9600);63
64 while (!Serial) {65
66 ; // wait for serial port to connect. Needed for Leonardo only67
68 }69}70
71void loop() {72
73 use_proxy = false;74
75 // start module76
77 // if your SIM has PIN, pass it as a parameter of begin() in quotes78
79 Serial.print("Connecting NB IoT / LTE Cat M1 network...");80
81 if (nbAccess.begin(PINNUMBER) != NB_READY) {82
83 Serial.println(errortext);84
85 while (true);86
87 }88
89 Serial.println(oktext);90
91 // attach GPRS92
93 Serial.println("Attaching to GPRS...");94
95 if (gprsAccess.attachGPRS() != GPRS_READY) {96
97 Serial.println(errortext);98
99 } else {100
101 Serial.println(oktext);102
103 // read proxy introduced by user104
105 char proxy[100];106
107 Serial.print("If your carrier uses a proxy, enter it, if not press enter: ");108
109 readSerial(proxy);110
111 Serial.println(proxy);112
113 // if user introduced a proxy, asks him for proxy port114
115 int pport;116
117 if (proxy[0] != '\0') {118
119 // read proxy port introduced by user120
121 char proxyport[10];122
123 Serial.print("Enter the proxy port: ");124
125 readSerial(proxyport);126
127 // cast proxy port introduced to integer128
129 pport = (int) proxyport;130
131 use_proxy = true;132
133 Serial.println(proxyport);134
135 }136
137 // connection with example.org and realize HTTP request138
139 Serial.print("Connecting and sending GET request to example.org...");140
141 int res_connect;142
143 // if use a proxy, connect with it144
145 if (use_proxy) {146
147 res_connect = client.connect(proxy, pport);148
149 } else {150
151 res_connect = client.connect(url, 80);152
153 }154
155 if (res_connect) {156
157 // make a HTTP 1.0 GET request (client sends the request)158
159 client.print("GET ");160
161 // if use a proxy, the path is example.org URL162
163 if (use_proxy) {164
165 client.print(urlproxy);166
167 } else {168
169 client.print(path);170
171 }172
173 client.println(" HTTP/1.1");174
175 client.print("Host: ");176
177 client.println(url);178
179 client.println("Connection: close");180
181 client.println();182
183 Serial.println(oktext);184
185 } else {186
187 // if you didn't get a connection to the server188
189 Serial.println(errortext);190
191 }192
193 Serial.print("Receiving response...");194
195 boolean test = true;196
197 while (test) {198
199 // if there are incoming bytes available200
201 // from the server, read and check them202
203 if (client.available()) {204
205 char c = client.read();206
207 response += c;208
209 // cast response obtained from string to char array210
211 char responsechar[response.length() + 1];212
213 response.toCharArray(responsechar, response.length() + 1);214
215 // if response includes a "200 OK" substring216
217 if (strstr(responsechar, "200 OK") != NULL) {218
219 Serial.println(oktext);220
221 Serial.println("TEST COMPLETE!");222
223 test = false;224
225 }226
227 }228
229 // if the server's disconnected, stop the client:230
231 if (!client.connected()) {232
233 Serial.println();234
235 Serial.println("disconnecting.");236
237 client.stop();238
239 test = false;240
241 }242
243 }244
245 }246}247
248/*249
250 Read input serial251
252 */253int readSerial(char result[]) {254
255 int i = 0;256
257 while (1) {258
259 while (Serial.available() > 0) {260
261 char inChar = Serial.read();262
263 if (inChar == '\n') {264
265 result[i] = '\0';266
267 return 0;268
269 }270
271 if (inChar != '\r') {272
273 result[i] = inChar;274
275 i++;276
277 }278
279 }280
281 }282}MKR NB Test Modem
This sketch tests the modem on the MKR NB 1500 to see if it is working correctly. You do not need a SIM card for this example.
1/*2
3 This example tests to see if the modem of the4
5 MKR NB 1500 board is working correctly. You do not need6
7 a SIM card for this example.8
9 Circuit:10
11 * MKR NB 1500 board12
13 * Antenna14
15 Created 12 Jun 201216
17 by David del Peral18
19 modified 21 Nov 201220
21 by Tom Igoe22
23*/24
25// libraries26#include <MKRNB.h>27
28// modem verification object29
30NBModem modem;31
32// IMEI variable33
34String IMEI = "";35
36void setup() {37
38 // initialize serial communications and wait for port to open:39
40 Serial.begin(9600);41
42 while (!Serial) {43
44 ; // wait for serial port to connect. Needed for Leonardo only45
46 }47
48 // start modem test (reset and check response)49
50 Serial.print("Starting modem test...");51
52 if (modem.begin()) {53
54 Serial.println("modem.begin() succeeded");55
56 } else {57
58 Serial.println("ERROR, no modem answer.");59
60 }61}62
63void loop() {64
65 // get modem IMEI66
67 Serial.print("Checking IMEI...");68
69 IMEI = modem.getIMEI();70
71 // check IMEI response72
73 if (IMEI != NULL) {74
75 // show IMEI in serial monitor76
77 Serial.println("Modem's IMEI: " + IMEI);78
79 // reset modem to check booting:80
81 Serial.print("Resetting modem...");82
83 modem.begin();84
85 // get and check IMEI one more time86
87 if (modem.getIMEI() != NULL) {88
89 Serial.println("Modem is functioning properly");90
91 } else {92
93 Serial.println("Error: getIMEI() failed after modem.begin()");94
95 }96
97 } else {98
99 Serial.println("Error: Could not get IMEI");100
101 }102
103 // do nothing:104
105 while (true);106}Suggested changes
The content on docs.arduino.cc is facilitated through a public GitHub repository. You can read more on how to contribute in the contribution policy.
License
The Arduino documentation is licensed under the Creative Commons Attribution-Share Alike 4.0 license.