Ethernet Shield AdvancedChat Server
Set up a simple chat server.
A more sophisticated server that distributes any incoming messages to all connected clients except the one that is sending the message. To use, open a terminal window, Telnet to your devices IP address, and type away. Any incoming text will be sent to all connected clients (including the one typing). Additionally, you will be able to see the client's input in your serial monitor as well.
Hardware Required
Arduino Board
Circuit
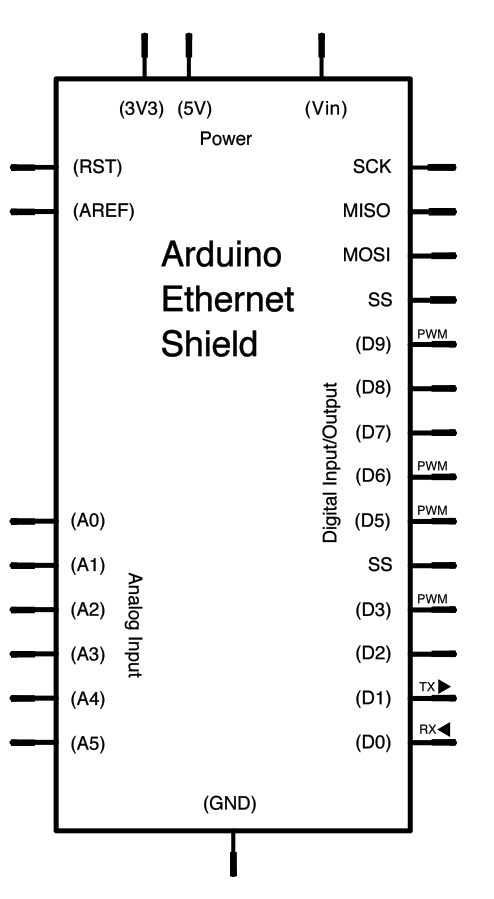
The Ethernet shield allows you to connect a WizNet Ethernet controller to the Arduino boards via the SPI bus. It uses pins 10, 11, 12, and 13 for the SPI connection to the WizNet. Later models of the Ethernet shield also have an SD Card on board. Digital pin 4 is used to control the chip select pin on the SD card.
The shield should be connected to a network with an ethernet cable. You will need to change the network settings in the program to correspond to your network.
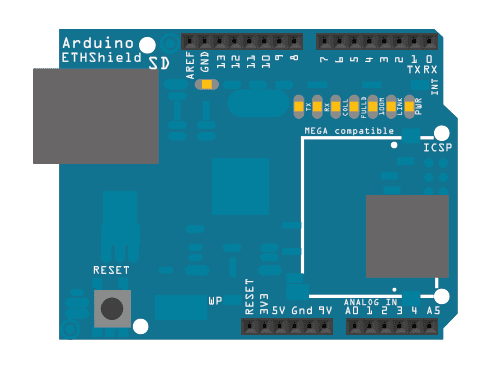
image developed using Fritzing. For more circuit examples, see the Fritzing project page
In the above image, the Arduino board would be stacked below the Ethernet shield.
Schematic
Code:
1/*2
3 Advanced Chat Server4
5 A more advanced server that distributes any incoming messages6
7 to all connected clients but the client the message comes from.8
9 To use, telnet to your device's IP address and type.10
11 You can see the client's input in the serial monitor as well.12
13 Using an Arduino Wiznet Ethernet shield.14
15 Circuit:16
17 * Ethernet shield attached to pins 10, 11, 12, 1318
19 created 18 Dec 200920
21 by David A. Mellis22
23 modified 9 Apr 201224
25 by Tom Igoe26
27 redesigned to make use of operator== 25 Nov 201328
29 by Norbert Truchsess30
31 */32
33#include <SPI.h>34#include <Ethernet.h>35
36// Enter a MAC address and IP address for your controller below.37// The IP address will be dependent on your local network.38// gateway and subnet are optional:39byte mac[] = {40
41 0xDE, 0xAD, 0xBE, 0xEF, 0xFE, 0xED42};43
44IPAddress ip(192, 168, 1, 177);45
46IPAddress myDns(192, 168, 1, 1);47
48IPAddress gateway(192, 168, 1, 1);49
50IPAddress subnet(255, 255, 0, 0);51
52// telnet defaults to port 2353
54EthernetServer server(23);55
56EthernetClient clients[8];57
58void setup() {59
60 // You can use Ethernet.init(pin) to configure the CS pin61
62 //Ethernet.init(10); // Most Arduino shields63
64 //Ethernet.init(5); // MKR ETH shield65
66 //Ethernet.init(0); // Teensy 2.067
68 //Ethernet.init(20); // Teensy++ 2.069
70 //Ethernet.init(15); // ESP8266 with Adafruit Featherwing Ethernet71
72 //Ethernet.init(33); // ESP32 with Adafruit Featherwing Ethernet73
74 // initialize the Ethernet device75
76 Ethernet.begin(mac, ip, myDns, gateway, subnet);77
78 // Open serial communications and wait for port to open:79
80 Serial.begin(9600);81
82 while (!Serial) {83
84 ; // wait for serial port to connect. Needed for native USB port only85
86 }87
88 // Check for Ethernet hardware present89
90 if (Ethernet.hardwareStatus() == EthernetNoHardware) {91
92 Serial.println("Ethernet shield was not found. Sorry, can't run without hardware. :(");93
94 while (true) {95
96 delay(1); // do nothing, no point running without Ethernet hardware97
98 }99
100 }101
102 if (Ethernet.linkStatus() == LinkOFF) {103
104 Serial.println("Ethernet cable is not connected.");105
106 }107
108 // start listening for clients109
110 server.begin();111
112 Serial.print("Chat server address:");113
114 Serial.println(Ethernet.localIP());115}116
117void loop() {118
119 // check for any new client connecting, and say hello (before any incoming data)120
121 EthernetClient newClient = server.accept();122
123 if (newClient) {124
125 for (byte i=0; i < 8; i++) {126
127 if (!clients[i]) {128
129 Serial.print("We have a new client #");130
131 Serial.println(i);132
133 newClient.print("Hello, client number: ");134
135 newClient.println(i);136
137 // Once we "accept", the client is no longer tracked by EthernetServer138
139 // so we must store it into our list of clients140
141 clients[i] = newClient;142
143 break;144
145 }146
147 }148
149 }150
151 // check for incoming data from all clients152
153 for (byte i=0; i < 8; i++) {154
155 if (clients[i] && clients[i].available() > 0) {156
157 // read bytes from a client158
159 byte buffer[80];160
161 int count = clients[i].read(buffer, 80);162
163 // write the bytes to all other connected clients164
165 for (byte j=0; j < 8; j++) {166
167 if (j != i && clients[j].connected()) {168
169 clients[j].write(buffer, count);170
171 }172
173 }174
175 }176
177 }178
179 // stop any clients which disconnect180
181 for (byte i=0; i < 8; i++) {182
183 if (clients[i] && !clients[i].connected()) {184
185 Serial.print("disconnect client #");186
187 Serial.println(i);188
189 clients[i].stop();190
191 }192
193 }194}Last revision 2018/08/23 by SM
Suggested changes
The content on docs.arduino.cc is facilitated through a public GitHub repository. You can read more on how to contribute in the contribution policy.
License
The Arduino documentation is licensed under the Creative Commons Attribution-Share Alike 4.0 license.